Build with Sparkling Water
This short tutorial introduces Sparkling Water project enabling H2O platform execution on the top of Spark.
The tutorial guides through project building and demonstrates capabilities of Sparkling Water on the example using Spark Shell to build a Deep Learning model with help of H2O algorithms and Spark data wrangling.
Project Repository
The Sparkling Water project is hosted on GitHub. To clone it:
$ git clone https://github.com/0xdata/sparkling-water.git
$ cd sparkling-water
The repository is also already prepared on the provided H2O:
cd ~/devel/sparkling-water
Build the Project
The provided top-level gradlew command is used for building:
$ ./gradlew build
The command produces an assembly artifact which can be executed directly on the Spark platform.
Run Sparkling Water
Export your Spark distribution location
$ export SPARK_HOME=/opt/spark
Note: The provided sandbox image already contains exported shell variable
SPARK_HOME
Run Sparkling Water
Start a Spark cluster with Sparkling Water:
bin/run-sparkling.sh
Go to http://localhost:54321/steam/index.html to access H2O web interface.
Note: By default, the command creates a Spark cluster specified by
local-cluster[3,2,1024], the Spark master address. Hence, the cluster contains 3 worker nodes, with each node running H2O services.
Run Sparkling Shell
Start Spark shell with Sparkling Water:
bin/sparkling-shell
Note: The command launches a regular Spark shell with H2O services. To access the Spark UI, go to [http://localhost:4040](http://localhost:4040), or to access H2O web UI, go to http://localhost:54321/steam/index.html.
Step-by-Step Example
Run Sparkling shell with an embedded cluster consisting of 3 Spark worker nodes:
export MASTER="local-cluster[3,2,1024]"
bin/sparkling-shell
You can go to http://localhost:4040/ to see the Sparkling shell (i.e., Spark driver) status.

Create an H2O cloud using all 3 Spark workers:
import org.apache.spark.h2o._
import org.apache.spark.examples.h2o._
val h2oContext = new H2OContext(sc).start()
import h2oContext._
Load weather data for Chicago international airport (ORD) with help from the regular Spark RDD API:
val weatherDataFile = "/data/h2o-training/sparkling-water/weather_ORD.csv"
val wrawdata = sc.textFile(weatherDataFile,3).cache()
// Parse and skip rows composed only of NAs
val weatherTable = wrawdata.map(_.split(",")).map(row => WeatherParse(row)).filter(!_.isWrongRow())
Load and parse flight data using H2O's API:
import java.io.File
val dataFile = "/data/h2o-training/sparkling-water/allyears2k_headers.csv.gz"
// Load and parse using H2O parser
val airlinesData = new DataFrame(new File(dataFile))
Go to H2O web UI and explore data:

Select flights with a destination in Chicago (ORD) with help from the Spark API:
val airlinesTable : RDD[Airlines] = toRDD[Airlines](airlinesData)
val flightsToORD = airlinesTable.filter(f => f.Dest==Some("ORD"))
Compute the number of these flights:
flightsToORD.countUse Spark SQL to join the flight data with the weather data:
import org.apache.spark.sql.SQLContext
val sqlContext = new SQLContext(sc)
import sqlContext._
flightsToORD.registerTempTable("FlightsToORD")
weatherTable.registerTempTable("WeatherORD")
Perform SQL JOIN on both tables:
val bigTable = sql(
      """SELECT
        |f.Year,f.Month,f.DayofMonth,
        |f.CRSDepTime,f.CRSArrTime,f.CRSElapsedTime,
        |f.UniqueCarrier,f.FlightNum,f.TailNum,
        |f.Origin,f.Distance,
        |w.TmaxF,w.TminF,w.TmeanF,w.PrcpIn,w.SnowIn,w.CDD,w.HDD,w.GDD,
        |f.ArrDelay
        |FROM FlightsToORD f
        |JOIN WeatherORD w
        |ON f.Year=w.Year AND f.Month=w.Month AND f.DayofMonth=w.Day""".stripMargin)
Run deep learning to produce a model estimating arrival delays:
import hex.deeplearning.DeepLearning
import hex.deeplearning.DeepLearningModel.DeepLearningParameters
val dlParams = new DeepLearningParameters()
dlParams._train = bigTable
dlParams._response_column = 'ArrDelay
dlParams._epochs = 100
// Create a job
val dl = new DeepLearning(dlParams)
val dlModel = dl.trainModel.get
Use the model to estimate delays using training data:
val predictionH2OFrame = dlModel.score(bigTable)('predict)
val predictionsFromModel = toRDD[DoubleHolder](predictionH2OFrame).collect.map(_.result.getOrElse(Double.NaN))
Generate an R-code to show the residuals graph:
println(s"""
#
# R script for residual plot
#
# Import H2O library
library(h2o)
# Initialize H2O R-client
h = h2o.init()
# Fetch prediction and actual data, use remembered keys
pred = h2o.getFrame(h, "${predictionH2OFrame._key}")
act = h2o.getFrame (h, "${rame_rdd_14_b429e8b43d2d8c02899ccb61b72c4e57}")
# Select right columns
predDelay = pred$$predict
actDelay = act$$ArrDelay
# Make sure that number of rows is same
nrow(actDelay) == nrow(predDelay)
# Compute residuals
residuals = predDelay - actDelay
# Plot residuals
compare = cbind (as.data.frame(actDelay$$ArrDelay), as.data.frame(residuals$$predict))
nrow(compare)
plot( compare[,1:2] )
""")
Open RStudio and execute the generated code:
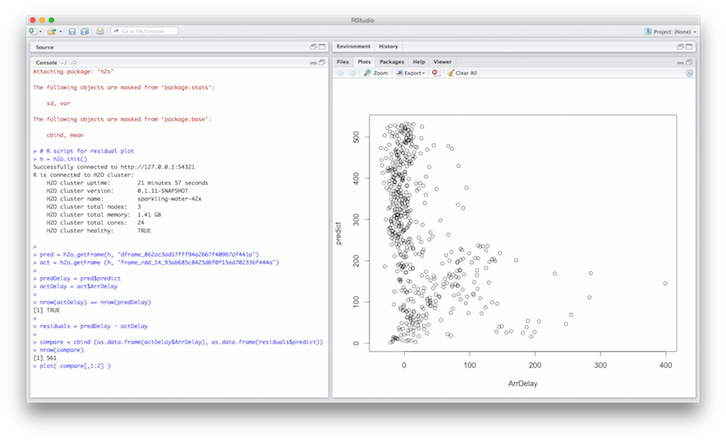
Note: RStudio must contain the newest H2O-DEV client library.